![]()
![]()
LESSON 18: Current
Lesson
FROG
KICK BEFORE RETREATING (right)
BACKWARD
STEP, BEATING THE TIGER
RIGHT
FROG KICK
| please read the following text information while the images load on the page |
| JUST CLICK ON ANY LESSON # BELOW TO VIEW IT |
| LESSON #1 | LESSON #7 | LESSON #13 |
| LESSON #2 | LESSON #8 | LESSON #14 |
| LESSON #3 | LESSON #9 | LESSON #15 |
| LESSON #4 | LESSON #10 | LESSON #16 |
| LESSON #5 | LESSON #11 | LESSON #17 |
| LESSON #6 | LESSON #12 | LESSON #19 |
| NAMES OF POSTURES |
Letters in ( )* stand for
the eight directions=N, S, E, W, NW, NE, SW, SE.
Numbers in ( )*
correlate to the frame number in main lesson image below,
as much as possible...(some frames are 'in between' described movements,
in which case either I will try to redo the image, or you will need to exercise
your imagination even more than is necessary to learn any movement art from
'text and images' alone in the first place.)
Formula in brackets [W= ] denote weightedness,
which is the amount of body
weight shifted to either side (L=left, R=right, even=doubleweightedness);
example: [W=70R] means 'put 70% of your weight on your right
side.' The range
here will be approximate, ideally based on an individuals personal needs,
abilities
and experience. *You
may choose to read through the text the first time disregarding these
parentheticals...it's easier!!
We OPENED the
set (Lesson 1) facing North(N); as you view
images on your monitor for the current postures (below),
imagine that you are now facing West(W) as you begin Lesson
18. As you end this lesson (right frog kick) you are still facing West(W).
| Frog
kick before retreating (right) Backward step, beating the tiger Right frog kick Frog kick before retreating (right) (1 through 16) Lesson #17 concludes with patting the horse, with your right hand resting before you, fingertips pointing up, and your right palm facing (South) in toward your left hand. Your left hand, with fingertips pointing away (West) and palm facing up, rests near the right hand as if both are holding onto a small globe or ball. Both feet aim toward the West, with your left leg resting at a comfortable distance ahead of you on your left heel only, and your right leg directly beneath you supporting most of your weight [W= 90R] as patting the horse concludes. (1) (Frog kick before retreating begins identically to moves number 11 through 18 in the first part of the right kick in Lesson #15; though, instead of resting your right leg down following the right kick, so as to kick your left leg immed- iately thereafter, this time, you draw back, or retreat, your right leg behind you and to your right in order to set up the second frog kick of this lesson.) Begin frog kick before retreating by lowering down your left toe [W= 80R], slowly turning your left foot to the left corner (SW) as it lowers (2-5) and you continue your forward momentum. As your left foot moves out and turns to the corner, both of your hands begin to move. Your right hand and forearm rotate toward your left (South) at the elbow, which rises slightly, with your right palm turning to face downward to the floor with fingertips pointing leftward (South). At the same time, your left hand and forearm rotate toward your right (North) at the elbow, which rises slightly, with your left palm still facing upward throughout. Hence, at this point, your arms are inches from, and parallel to, each other, and parallel to the floor as well. (4) All the while, you continue to shift your weight forward and toward the corner (SW) as your entire torso twists to face in that direction [W= 60R]. Because you face the corner now, your right fingers point toward the SE corner while your left fingers point the opposite direction (NW). Next, as you continue shifting your weight [W= even] forward, move your elbows toward each other, so that your hands move further apart. As your elbows pass by each other, with the right elbow slightly above the left, they begin to rotate (5), turning the arms clockwise in a circle. [W= 60L] This occurs by rotating both your right and left elbows to the right just as they pass each other. This causes the left forearm to lower, then move leftward, then upward, as the right forearm rises, then moves rightward, then downward, then leftward, and finally upward again, meeting at an apex with the left. (5-11) As your arms rotate at the elbows in a circle, your palms rotate at the wrists: the right palm initially facing downward, then turning to face away from you (West) as it rises up and lowers down, finally again turning to face you as it rises the second time to meet your left palm; the left palm meanwhile starts out facing the ceiling, then turns to face toward you (East) before turning to face away from you (West) as it completes the circle, rising to meet your right hand. (11) [W= 80L] As both hands complete the circle and meet, your hands cross each other, (with your right arm moving outside of -- further away from you than -- your left), and form into fists (enclosing your four fingers with the thumb either over them, or on the end of the fist, but not inside of the fingers) at about eye level, with the back of your right hand facing away from you (West) and the back of your left hand facing toward you (East). Your left hand rests just inside (grazing) your right hand, with both hands aiming upward away from each other at diagonals (i.e., crossed). (11) Simultaneous to the movement of your arms in a circle, shifting your weight forward pulls your right foot slowly up off of the floor, heel first (6,7) [W= 90L], then toe (8). [W= 100L] As your arms finish their circling, your right foot moves forward (8-10), ahead of your left foot and rests several inches off of the floor, pointing toward the SW corner (11) with your toes pointing slightly downward. [W= 100L] Frog kick before retreating concludes as you first cock, or turn, at your waist, your entire torso slightly toward your left (SE). Then reverse direction as you begin to rotate at your waist toward your right 90°, so that you eventually face the opposite corner (NW). Your 'floating' right leg [W= 100L] concurrently moves as one, first briefly leftward, then springing back in the opposite direction toward your right (12-14), and ultimately resting in the air pointing toward the NW corner (15). Unbend your right knee more as your right leg reaches the corner. Your leg becomes a bit more straightened out in this kick than in the ones in Lesson #15. [see image below] 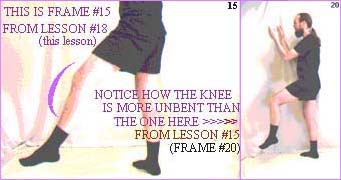 After moving slightly leftward initially, as your torso and, with it, your right leg, move rightward, your arms separate (fists uncross). Your right arm moves rightward as your right wrist rotates outward, away from you, your fist slowly unclenching until your right palm finally reaches the corner, facing away from you (NW), vertically, with fingers pointing upward. Also as you rotate rightward, your left hand simultaneously moves leftward to the opposite corner as its fist slowly unclenches until your left palm reaches that corner (SW), facing away from you, resting vertically, with fingers pointing upward. (15,16) [W= 100L] Backward step, beating the tiger (16 through 27) Backward step, beating the tiger begins as you draw your right leg backward (16-18), directly behind you, pulling it in a line from the NW corner toward the SE corner in a kind of reverse step through, again bending your right knee more as you do. As your right leg passes your left leg, and reaches a comfortable distance behind and to the right of it, you rest down your right toe [W= 90L] first (17), then heel (18,19) [W= 70L]. Here your two feet form at about a 90° angle with each other; your right foot points directly ahead of you (NW) and your left foot is turned to your absolute left (SW). As you draw your leg backward and rest down your right foot again, your torso nears completion of its rotation to the NW corner. As your right toe rests down, your left hand starts to move around from its position in the SW corner, curving toward the NW corner, following your torsos continued rightward rotation. After your right heel rests down, your left hand finishes arcing around (19) to your right [W= even], where it meets up with your right hand,ą with the palms of both hands facing each other and all fingers pointing out toward the NW corner. (20) As your hands come together, your weight continues shifting onto your right side and you lift up your left heel only (19) (once your right foot is firmly planted) [W= 70R], and pivot on the ball only of your left foot toward your right [W= 90R], twisting your left foot from pointing toward the SW corner to pointing toward the NW corner. Both feet are then about parallel to one another. Next, completely shift your weight onto your right leg as you lift your left toe up (20) off of the floor [W= 100R] and again (with the opposite leg this time) step backward. Draw your left leg backward, directly behind you, pulling it in a line (20-22) from the NW corner toward the SE corner in a reverse step through, again bending your left knee more as you do. Your left leg passes your right and your weight begins to shift. As your left leg reaches a comfortable distance behind and to the left of your right leg, and you rest down your left toe [W= 90R] first (21), then heel (22) [W= 70R]. Both feet again are about parallel to one another, pointing to the NW corner. As your left leg steps backward, both of your hands descend together in an arc, sweeping in the same direction as your left leg, backward toward you. As your hands drop lower, follow them steadily with a fixed gaze.˛ Your palms turn from facing each other to facing downward as they reach their nadir at about your waist level (25). The motion of both of your arms and of your left leg are more or less in tandem with one another. After your left heel touches down, continue shifting your weight onto your left side again [W= even], lift up your right toe only (23) [W= 70L] and pivot on the heel only of your right foot toward your left [W= 90L]. Turn your right foot (23-25) from pointing toward the NW corner to pointing toward the SW corner, then rest your right toe down again (25) [W= 70L]. Your entire torso rotates at your waist toward your left, turning you from facing the NW corner to facing the SW corner as you finish this pivot. As your torso rotates leftward, both of your hands move leftward with it as one, positioned with palms down, just in front of you, still at about waist level. Continue following your hands with your gaze. Your right foot now points toward the SW corner as your left foot still points toward the NW corner; hence, your toes point nearly toward each other as if you are pigeon-toed. After your right toe touches down, continue shifting your weight onto your right side again [W= even], lift up your left toe only (25) [W= 70R] and pivot further toward your left on your left heel only [W= 90R]. Turn your left foot 135°, (26,27) from pointing toward the NW corner to pointing directly South, then rest your left toe down again (27) [W= 70R]. As with this whole series of pivots, your entire torso rotates at your waist toward your left. This last pivot in this direction turns you from facing the SW corner to facing due South. At the same time, your hands continue to move toward your left and begin to move away from each other again. Your right palm turns from facing downward to face toward you with fingers extended downward and to your left (25-30). It remains at waist level just a few inches in front of your groin area throughout the rest of backward step, beating the tiger and into the first part of the next posture. (As rotation of your torso leftward does conclude, forthwith, of course, your right hand does actually move, not independently though; it moves as one with you, as you rotate, remaining directly before your groin area as you turn.) Your left hand meanwhile moves briefly further to your left before sweeping gently in an upward arc (25-27), with your left palm turning from facing downward to facing away from you (South) as it does, ending up positioned palm away, thumb down, few inches in front of your forehead as you conclude this pivot of your left foot. After your left toe touches down, continue shifting your weight onto your left side [W= even], and finally shift forward (South) a bit [W= 70L], positioning your left knee above, but not further out than, your left toe (27). As you conclude backward step, beating the tiger, your two feet form at about a 45° angle with each other with your left foot, pointing directly to the South, resting comfortably ahead of your right foot, pointing to the SW corner. Right frog kick (28 through 34) Right
frog kick begins as you lift your left
toe only (28) [W= 80L] and pivot on your left
heel only [W=
90L]ł
toward your right, turning your left foot (28-30) from pointing
toward the South
to pointing toward the SW
corner. As you pivot, your entire torso rotates at your waist
toward your right, turning your body from facing South
to facing SW. Both
of your arms simply follow the chi movement here, remaining just as
they were at the conclusion of backward
step, beating the tiger throughout this
pivot. As your body completes turning 45°and faces SW,
rest down your left toe (30). Both feet now briefly point
to the SW
corner.
~ ~ ~ ~ ~ (Remember to keep your knees and elbows at least slightly bent and your pelvis tucked in throughout the set.) (If at all possible, it is suggested that someone read the text to you - or record it on a tape and play it back - while you slowly practice the form...and slowly is the best way to practice.)
|
|
do not over-do
do not under-do
|
|
FUNDAMENTALS OF |
May I suggest the best way to see these
images in the days after
the lesson page has changed is to 'right click' on those images you want NOW
and click
'save image as', then save it to some hard drive (the loads are BIG!)
You can also freely copy/paste/amend the text. (But do not sell, please)
~ ~ special thanks
~ ~
to
Michael W and Shar'n
for making free cyberspace available for MORE Playshop lessons at
www.caliban.net
NOW all of the Playshop lessons should ALWAYS be available online
~ ~ ~
please visit bill douglas' wonderful site to promote World
Tai Chi & Qigong Day at
http://www.worldtaichiday.org
~ ~ ~
Follow my movement on your monitor.
You will be performing a Right Hand Set...
(Tai chi is practiced from both sides)
When YOU practice tai chi, move slowly
(and hopefully less jerkily than this animation)
If the pictures stop animating on your page,
hit reload (refresh)
(I've even had to "clear memory
cache" first if I interrupted initial page loading)
|
|
| JUST CLICK ON ANY LESSON # BELOW TO VIEW IT |
| LESSON #1 | LESSON #7 | LESSON #13 |
| LESSON #2 | LESSON #8 | LESSON #14 |
| LESSON #3 | LESSON #9 | LESSON #15 |
| LESSON #4 | LESSON #10 | LESSON #16 |
| LESSON #5 | LESSON #11 | LESSON #17 |
| LESSON #6 | LESSON #12 | LESSON #19 |
| V NAMES OF POSTURES |
~ ~ ~ ~
~
notes:
I made the Tai Chi graphic images using a reverse image option so that
I could
video the Left Hand Set, then when it is viewed here on your monitor, it appears
as a mirror image of a Right Hand Set, which you can emulate by following
my movements. Most Tai Chi students only learn the Right Hand Set, and
it is a good way to start. One can practice the opposite side movements
(Left Hand) by practicing the reverse of the image(s) above. I
am fortunate that the students who instructed me at my 'tai chi beginning'
practiced both sides of the set daily. By learning the left and right
versions (identical, just reversed) of tai chi, I believe one may gain even
more.
~ ~ ~
~ ~
more notes:
Please
let me know what you like here and what really bugs you here, too
TO EMAIL HERE PLEASE MANUALLY CHANGE 'AT'
TO '@'
Is there some aspect of the movement not made clear by the images
(or the text, for that matter)?? Please tell me, and if I cannot clarify
it with words I will try to make a new image to illustrate a way out
of that confusion.
~ ~ ~
~ ~
still more notes:
It is better by far to experience learning Tai Chi of any kind
in a group setting, primarily for two reasons. First, it's more fun! and
nothing is better for learning than sharing ideas and practice with individuals
who share the same interests. By having many artisans practice together,
this allows for an excellent source of useful feedback. More than critically
watching the moves as others do them, this also affords an opportunity that
is unparalleled: by standing in the center surrounded by more advanced students,
with every movement in every direction, the novice has a rotating view of
the form. This allows the newer student to follow all the others, even
as the plane of movement tangents onto a new direction. Turn left, a
senior student is in front to follow from; turn right, another teacher is
in view;
spin around 180° and, yep, you guessed it.
Though learning Tai Chi from pictures, and (sometimes even worse) from text,
is not the best method to use...it is what I can offer. Some people
have little or no access to teachers or classes in their area; some have little
or no money for them even if they did exist; some folk are shy and some may
be to dis-eased to go to a class; it is for all these people (the ones online,
at least) and of course for the martial arts intellectuals (you know who you
are) that I make this meager presentation.
For anyone in or near (or just visiting) the
San Francisco Bay Area, please accept our invitation to join us in our VIRTUAL REALITY
PLAYSHOP
(real people), any Saturday morning from 8:45 a.m. to 9:45 a.m.
at 1819 10th Street, in Berkeley.
(The set usually begins @ 9:10 a.m. Saturday
Just take the outside stairs on the south side of Finnish Hall to the top
to get in--or take the disabled folks elevator inside--if you need it)
~
~ ~ ~ ~
finally! feedback
finally, your notes:
Scott, I HAVE FEEDBACK
FOR YOU
and/or
I wanna get email when the lesson page changes :)
FEEDBACK FORM:
last updated on Monday, July 19, 2010 at 9:03 P.M. P.S.T.
COPYWRONG © 1997-2010 swrichie
ALL RIGHTS REVERSED
 copywrong
© 1998-2005 by
copywrong
© 1998-2005 by![]() swrichie for hand use creations
swrichie for hand use creations
![]()
ALL RIGHTS REVERSED
~ ~ ~ ~ ~
| we share some common strand in this universe...we | as one |
 A
A